Step-by-Step Guide to Paint a Gun Safe
Many gun owners want to personalize or refresh their gun safe, but the idea of painting it can feel intimidating. You’re not alone—lots of people struggle with how to do it right for a professional, long-lasting finish.
To paint your gun safe, first empty it and clean all surfaces with soap, water, and a degreaser or rubbing alcohol. Lightly sand to improve adhesion and wipe away dust.
Choose a durable, rust-resistant paint like enamel or epoxy, and apply a suitable primer for metal. Use thin coats and a high-quality brush or spray for a smooth finish.
Let it dry completely, then add rust-resistant coatings. For more detailed steps, you’ll learn how to achieve a professional, long-lasting look.
Key Takeaways
- Take out everything from inside the safe and give it a good clean on both the inside and outside before you start painting.
- Lightly sand the surfaces to help the paint stick better, then apply a primer that’s suitable for metal.
- Use thin, even coats of a tough, rust-resistant paint, either with a brush or spray.
- Let each coat dry thoroughly, usually for 24 to 48 hours, before handling or adding more paint.
- Keep an eye on chips, scratches, or rust spots, and touch them up to keep the finish looking good.
How to Prepare Your Gun Safe for Painting
Before you start painting, it’s essential to properly prepare your gun safe. The first step is to prep the surfaces to make sure the paint sticks well and lasts a long time.
Start by removing all your items from the safe, then give the interior and exterior a thorough cleaning with soap and water. Use a degreaser or rubbing alcohol to get rid of oils, dirt, or grease that could interfere with the paint.
Once everything is clean, lightly sand the surfaces with fine-grit sandpaper. This creates a rough texture that helps the paint adhere better. After sanding, wipe away any dust with a tack cloth or a damp rag.
When choosing materials, go for a high-quality primer made for metal surfaces. Pick a durable, rust-resistant paint that’s suitable for steel. Proper preparation and good materials will give you a smooth, long-lasting paint job for your gun safe.
Choosing the Best Paint and Finish for Your Gun Safe
After preparing the surface, choosing the right paint and finish is key to making your gun safe look good and last a long time. When selecting paint types, go for durable, rust-resistant options like epoxy or enamel paints. They provide a tough, long-lasting finish that sticks well to metal and resists chipping or scratching.
You can choose spray paints for smooth, even coverage or brush-on options if you want more control. For finishes, you have matte, semi-gloss, or gloss to pick from. A semi-gloss or gloss finish gives a sleek look and is easier to clean, which is great for a gun safe.
Matte finishes hide imperfections better but can be harder to clean. Your choice depends on what look you want and how durable you need the finish to be. Picking the right mix of paint and finish will make sure your safe looks great and stays protected for years.
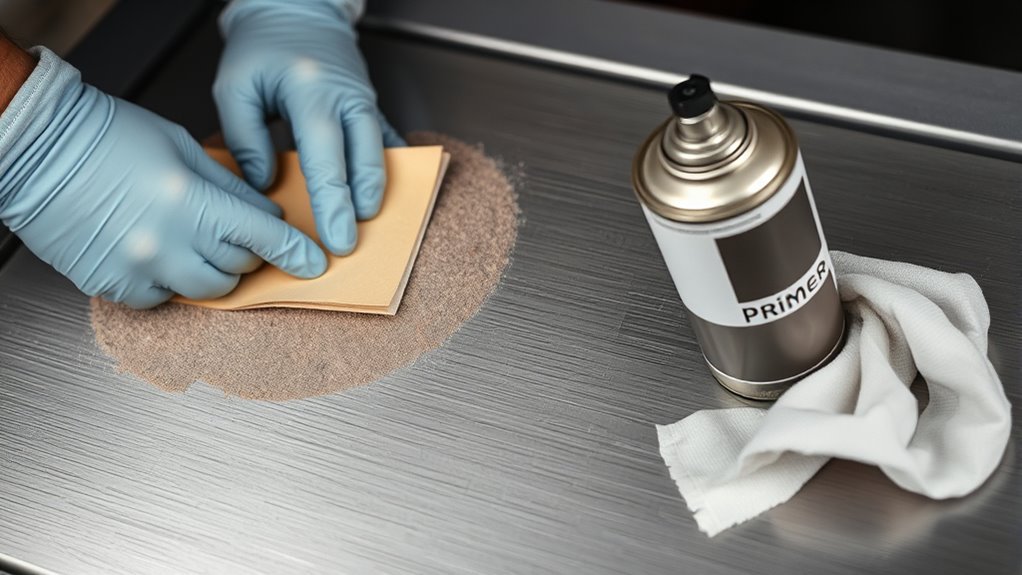
Cleaning, Sanding, and Removing Hardware for Better Results
Start by thoroughly cleaning the surface of your gun safe to remove dirt, grease, and rust, guaranteeing the paint will adhere properly. Use a degreaser or soapy water to clean the metal surface, then rinse and dry completely.
Once clean, sand the surface lightly with fine-grit sandpaper to create a rough texture that promotes better paint adhesion. Focus on any rusty or glossy areas to ensure the paint bonds securely.
If your safe has hardware like handles or locks, remove or mask them to prevent overspray and achieve a cleaner finish. Removing hardware also helps you access tricky spots and guarantees a professional look.
Take your time with this prep work, as it’s essential for a smooth, durable paint job. Proper cleaning, sanding, and hardware removal set a solid foundation, making certain the paint adheres well and lasts longer.
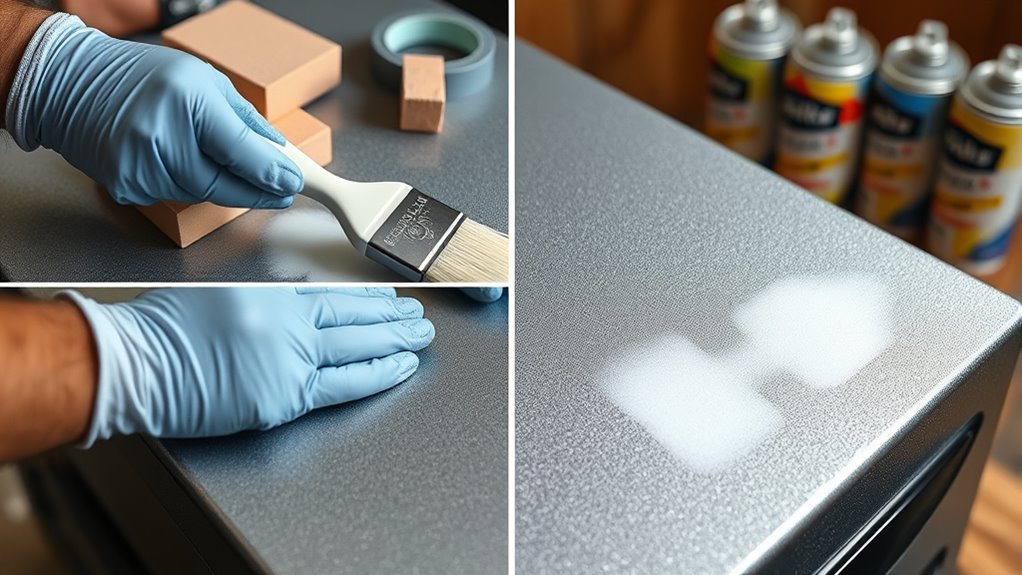
Applying Primer for a Smooth, Durable Finish
Applying primer is an essential step that guarantees your paint sticks properly and creates a smooth, even surface. Choosing the right primer types is vital—oil-based, latex, or shellac primers each serve different needs. Oil-based primers are durable and ideal for metal surfaces, while latex primers are easier to work with and quick-drying. Shellac primers work well for sealing stains and odors.
Follow these application techniques for the best results. First, prepare the surface by cleaning and sanding thoroughly. Use a high-quality brush or roller to apply the primer evenly. Work in thin coats to prevent drips and ensure full coverage. Finally, allow adequate drying time before applying the paint.
Techniques for Painting a Gun Safe Like a Pro
Achieving a professional-looking finish on your gun safe requires careful technique and attention to detail. Using proper spray techniques helps you get a smooth, even coat without brush marks. Hold the spray gun about 6-12 inches from the surface and use steady, overlapping passes to prevent drips and streaks.
Keep a consistent speed and distance for uniform coverage. When you’re using a brush, choose high-quality brushes suited for your paint type. Use light, even strokes and avoid pressing too hard, which can cause brush marks.
Work in small sections, blending edges seamlessly. For the best results, apply multiple thin coats instead of one heavy layer. Maintain a wet edge to avoid lap marks and always follow the manufacturer’s drying times between coats.
Whether you’re spraying or brushing, patience and precision are key to achieving a professional, durable finish on your gun safe.
How Long Does It Take to Cure Paint on a Gun Safe?
Wondering how long it takes for your painted gun safe to fully cure? The curing time depends on the type of paint you used, but usually, you should expect at least 24 to 48 hours for it to dry.
Typically, painted gun safes take 24 to 48 hours to dry, with full curing up to a week.
That said, the complete curing process can take longer—often up to a week—to ensure the paint reaches its maximum durability.
Here are some key points to keep in mind:
- Type of Paint: Oil-based paints tend to cure slower than latex or acrylic paints.
- Environmental Conditions: Drying is faster in lower humidity and warmer temperatures.
- Thickness of Coats: Applying thin coats helps the curing process go more smoothly.
- Age of Paint: Freshly mixed or new paint might need more time to fully cure.
Patience during this process will give you a durable, smooth finish on your gun safe.
Adding Rust-Resistant Coatings to Protect Your Safe
To effectively protect your gun safe from rust, adding a rust-resistant coating is essential, especially if it’s exposed to moisture or humid environments. Rust prevention is key to maintaining the safe’s integrity and appearance over time.
Start with a clean, dry surface to guarantee proper coating application. Apply a high-quality rust-inhibiting primer designed for metal surfaces, covering all exposed areas thoroughly.
Once the primer dries, use a rust-resistant paint or coating formulated to withstand moisture and corrosion. Use a brush, roller, or spray to achieve an even coat, making sure to cover all nooks and crevices.
Multiple thin coats provide better protection than one thick layer. Allow each coat to dry completely before applying the next.
This coating application helps create a barrier that stops rust from forming and extends the life of your safe. Regularly inspect and reapply as needed for ongoing rust prevention.
Tips for Achieving a Clean, Even Paint Job
Getting a smooth, even paint job starts with proper preparation. Use high-quality paint suited for metal surfaces, like gloss or semi-gloss enamel, for a durable finish. To avoid streaks or uneven coverage, focus on your brush techniques: keep brushes well-loaded but not dripping, and use long, smooth strokes.
Achieve a flawless finish with proper prep, quality paint, and smooth, controlled brush strokes.
Here are four tips to guarantee a clean finish:
- Prime the surface thoroughly before painting to help the paint stick better.
- Work in thin coats—multiple layers will look more even than one thick coat.
- Maintain a wet edge by blending each stroke into the previous one before it dries.
- Use the right brush or roller for your paint type, like synthetic brushes for latex or oil-based paints.
Troubleshooting Common Painting Problems on Metal Surfaces
Even experienced painters can encounter common issues when working on metal surfaces, but most problems are easily fixable with the right approach. One frequent issue is poor paint adhesion, often caused by inadequate surface preparation.
To fix this, make sure you thoroughly clean the surface to remove dirt, grease, and rust. Sand the metal lightly to create a rough texture, which helps the paint stick better. Skipping proper surface prep can cause paint to peel or chip early.
Another common problem is uneven coverage or streaks. This happens when too much paint is used or it’s applied too thickly. Use thin, even coats and let each layer dry completely before adding the next.
Also, be sure you’re using the right primer and paint formulated for metal surfaces. Proper surface prep and careful application are key to getting a smooth, durable finish on your gun safe.
Maintaining and Touching Up Your Painted Gun Safe
Regular maintenance and timely touch-ups are key to keeping your painted gun safe looking great and protected from damage. Proper upkeep helps the paint stay durable and prevents rust or corrosion.
To keep your safe in top shape, follow these simple tips: regularly check for chips, scratches, or rust spots. Clean the surface gently with a non-abrasive cleaner to remove dirt and debris.
Use the right touch-up methods to fill in scratches or chips with matching paint. When doing repairs, lightly sand around damaged areas for better adhesion. Use a small brush for precision and blend the new paint smoothly with the existing finish.
Finish by applying a clear sealant or touch-up spray for extra protection and a seamless look. Consistent maintenance and smart touch-up techniques will help your safe last longer and stay looking sharp.
Frequently Asked Questions
Can I Paint a Gun Safe Indoors Safely?
Yes, you can paint a gun safe indoors safely if you focus on ventilation and safety precautions. Make sure you’re in a well-ventilated space by opening windows and using fans to help disperse the fumes.
Wear a mask and gloves to protect yourself from inhaling fumes and coming into contact with the paint. Good ventilation is key to avoiding harmful vapors and making indoor painting safer for you and your environment.
What Safety Precautions Should I Take During Painting?
Imagine you’re a painter wielding your brush in a cloud of color—safety is your shield. You should prioritize ventilation by opening windows and doors to keep fumes from building up.
Always wear protective gear like masks, gloves, and goggles to guard against harmful chemicals. Ventilation guarantees fresh air flows, while protective gear shields your skin and eyes.
This way, you can stay safe while transforming your gun safe into a work of art.
How Often Should I Repaint or Touch up My Gun Safe?
You should repaint or touch up your gun safe every 3 to 5 years to keep the paint looking its best. Regular inspections can help you spot chips or scratches early before they get worse.
Proper surface preparation before painting is key. It helps the paint stick better and last longer, so you won’t have to do touch-ups as often.
If you notice significant wear or rust, it’s a good idea to reapply paint. Keeping the surface clean and well-prepared will extend the paint’s lifespan and save you time and effort.
Is It Possible to Paint a Textured or Patterned Finish?
Sure, you can paint a textured or patterned finish on your gun safe. It’s surprisingly easy to add textured finishes or patterned designs if you want your safe to stand out or blend in.
Just use the right paint and tools like stencils or sponges. That way, you’ll create a unique look effortlessly.
Who knew transforming your safe into a work of art was so simple? Now’s your chance to get creative!
Can I Use Spray Paint Instead of Brush or Roller?
Yes, you can use spray paint instead of a brush or roller. It offers benefits like a smooth, even finish and can be faster, especially on textured or detailed surfaces.
But it’s important to prepare the surface properly to get good adhesion and a professional look. Make sure to clean it thoroughly, sand if needed, and apply a primer.
Then, spray in light, even coats, keeping the can at a consistent distance from the surface.
Conclusion
With patience and the right techniques, you can transform your gun safe into a sleek, protected fortress. Think of the painting process as a journey—you’re the artist shaping its new look and armor. Keep your tools sharp, your surface clean, and your finish even.
Before you know it, your safe will shine brighter than a lighthouse guiding ships home. It will stand tall and resilient against rust and wear. Happy painting!